
LED Lantern & Character Mask
Source: Stemoto Original
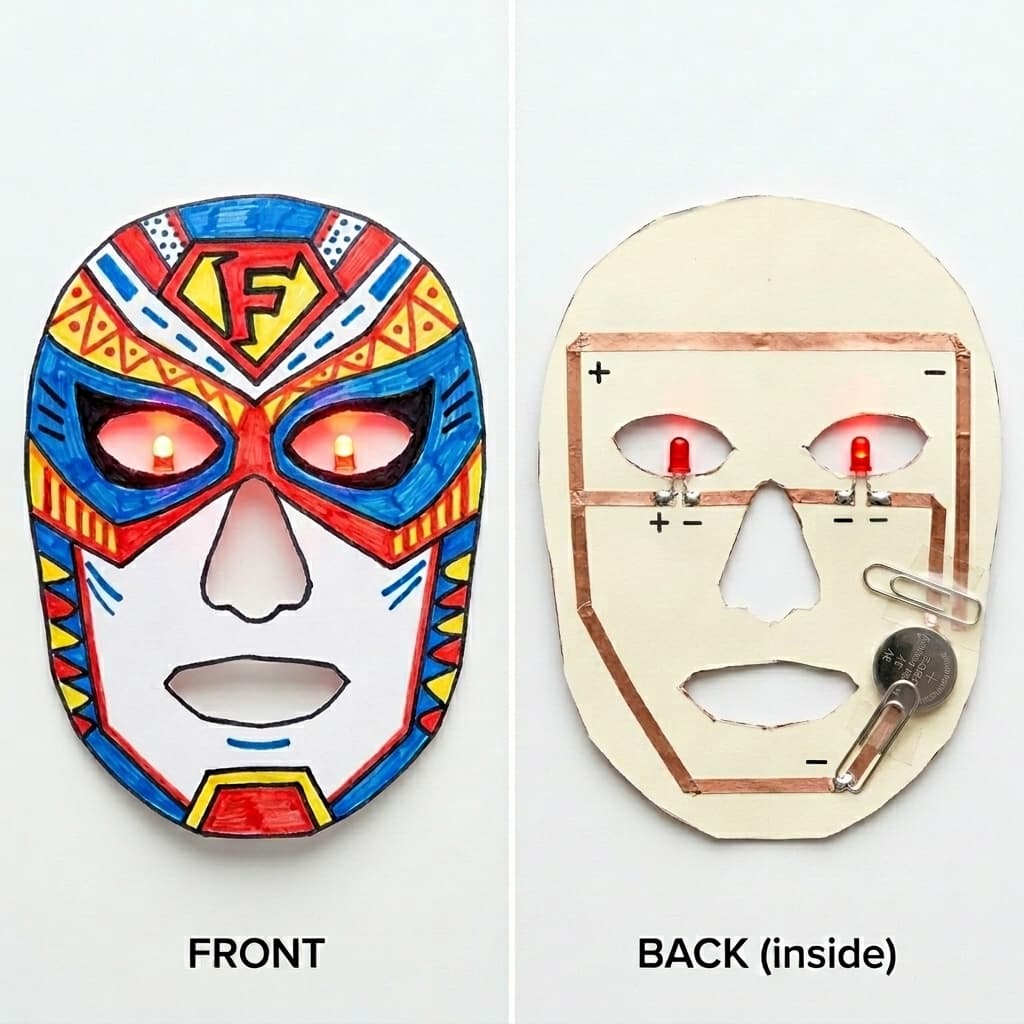
Design your own original character — a superhero, mythical creature, or alien — and bring it to life with glowing LED eyes! This project combines creative character design with basic electronics, giving kids both an artistic and a scientific challenge.
Categorisation
Props & Materials Required
- •2x LED lights (any color)
- •3V Coin cell battery (CR2032)
- •Copper tape or small alligator clips
- •Blank cardboard mask or small paper lantern
- •Craft supplies (hot glue, paint, feathers, markers)
- •Electrical tape
Step-by-Step Instructions
Design Your Character
Before touching any electronics, grab a pencil and paper. Who is your character? A fire-breathing dragon with red glowing eyes? A cool robot with blue LED sensors? A forest fairy with green lights? Sketch it out and decide: what LED color fits the character? Where will the light glow? This creative decision will guide every step that follows.
Prepare the Mask
Paint and decorate your blank mask to match your character design. Add feathers, paint, markers or stickers. Decide exactly where you want the LEDs to sit — usually right above or inside the eye holes for a dramatic effect.
Wire the Eyes
Take your two LEDs (in your character's chosen color!). You will be building a 'parallel circuit' so one battery powers both lights. Using copper tape on the inside of the mask, run a line connecting the long (positive) legs of both LEDs. Run a second, separate line connecting the short (negative) legs.
Route to the Battery
Extend both lines of copper tape down to a comfortable spot on the mask (like the forehead or cheek) where the battery won't bother the wearer.
Secure the Connections
Tape the LED legs down firmly to the copper tracks using clear or electrical tape to ensure a solid connection.
Power It Up & Show It Off!
Place the coin cell battery between the two copper tracks, ensuring the positive track touches the top (+) and the negative touches the bottom. Wrap it tightly with electrical tape. Put on your mask and introduce your character to the world!
Why It Works & Notes
This project merges two worlds — art and engineering. By designing a character first, kids have a creative goal that motivates every technical decision they make (which LED color suits the character? Where should the light go?). This context makes the circuit-building feel purposeful, not just mechanical.
Supervise battery usage and hot glue application closely with younger kids (ages 5-7). AI Optional: Have your child prompt an AI image generator for 'futuristic superhero mask design' to get inspiration for how they want to paint and decorate their mask!